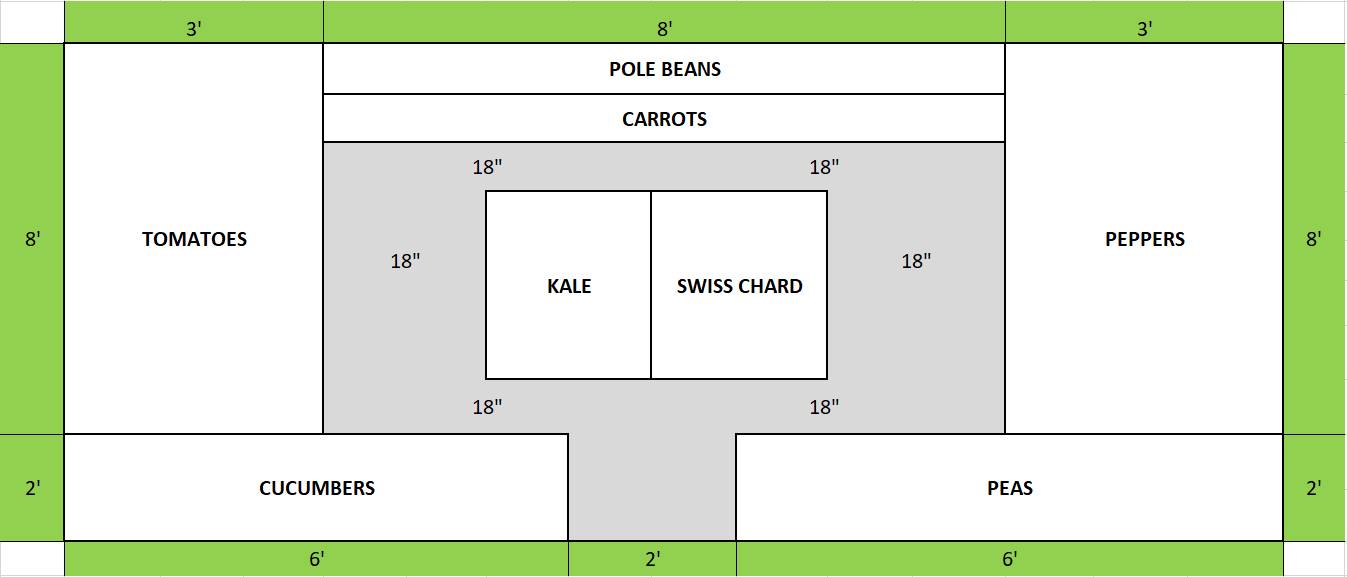
 All you need is a 14' x 10' space, time, and patience to create this garden at home We have already started getting lots of great questions through our Facebook page, and the most common one so far is some variation of "What should I grow?". Ultimately it comes down to 2 things: 1) How much space do you have? 2) What will you actually eat? There is no right or wrong way to go about this, so if you have something in mind give it a try and see how it works out. The great thing about gardening as a hobby is nobody is going to starve if you make a few mistakes. But if you're interested in breaking ground on a new garden and have no idea where to start or what to grow, we've created this simple garden template that will both be manageable and give you a constant stream of fresh vegetables from June-November. In theory you could follow it exactly but it's really meant more as a starting point for you to adapt based on your own space and preferences. Continue reading to find out what you'll need to get this up and running. Step 1: Dig It Out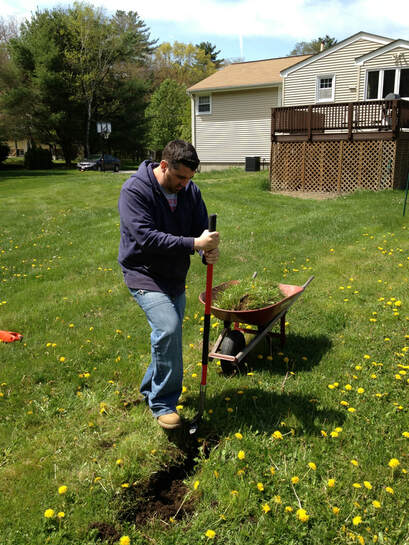 There are definitely more efficient and sophisticated methods, but all you really need for this is a flat shovel and a wheelbarrow. Your goal here is to remove the top layer of grass while leaving as much of the good dirt there as possible. If you cut out 1-2' squares it is easy to grab them and shake any excess dirt out. Dump the chunks of grass into a pile in the woods or somewhere out of the way and by next year it will be great compost to add back into your garden. Step 2: Add Soil and Compost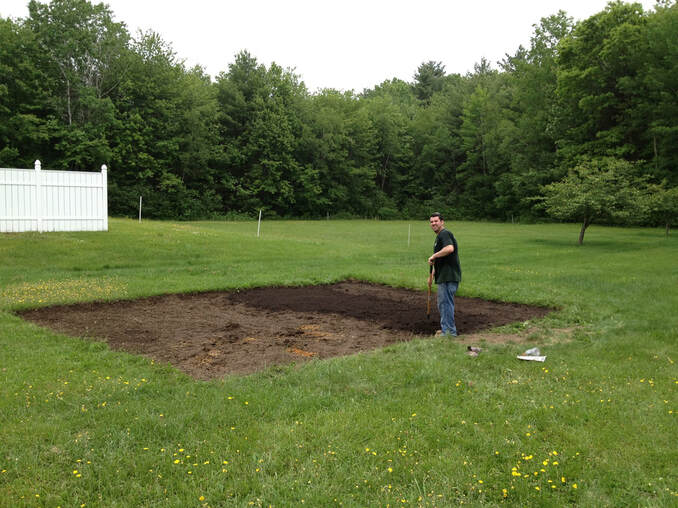 By removing the layer of grass and some topsoil you are lowering the level of your garden so you'll need to build that back up again for drainage purposes. Otherwise you run the risk of your new garden turning into your new pond. Almost any local greenhouse or garden center will deliver both loam (clean, rock free soil) and compost, but you can find it a lot cheaper if you're willing to look on Craigslist or something like that. Depending on how much you need, it may be more convenient and cost effective to just buy it by the bag at Home Depot or somewhere similar. Just make sure you grab the organic options and not the ones full of miracle grow chemical pellets. Wherever you get it from, try to build the soil level at least back up to where it was and preferably a little higher. For a new garden a mix of about 75% loam and 25% compost is a great start. Step 3: Protect It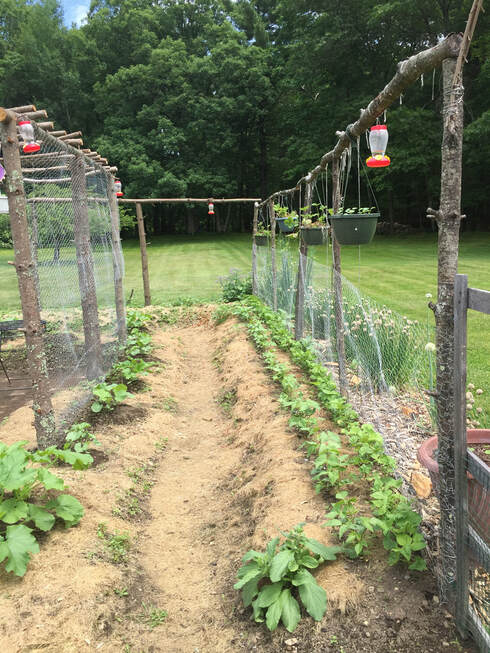 If you build it, they will come. And in this case they are rabbits. Unless you're willing to guard your plot 24/7 you really should fence it in. You may think they are cute now but just wait until you come out in the morning to see the tops eaten off your entire row of beans you were excited to see sprout from seed just a week before. It's a little more work up front but you'll be glad you did it. We used to use the green plastic garden fencing until one year a Peter Rabbit-like troublemaker taught his buddies you could chew right through it. All of a sudden there were secret entrances all over and patching one up just ended up with 2 more holes somewhere else. A couple years ago we switched over to chicken wire which seems to have done the trick. For the example garden above you would need 48' of perimeter fencing. You can get a 50' roll of 4' high chicken wire (sometimes called poultry netting) for $40 at Home Depot. The expensive part is the posts which go for $3-$4 each, but as you can see in the picture above we used free pine trees from the woods instead. It doesn't matter what you use for posts as long as they are sturdy and you can attach the fence to them. You'll want to dig a 1' deep trench around the perimeter of your garden. That way you can bury the bottom of the fence underground and animals wont be able to dig or slip under it. Bury your posts into the ground every 4-6' so that you can pull the fencing tight. Larger gaps will make the fence loose and easy to climb up and over. Depending on the post material, tie/nail/staple the chicken wire to complete the perimeter. Once you feel like its as tight and wrinkle free as possible, fill the ditch back in to bury the bottom 1' underground. Step 4: Make Your Bed(s)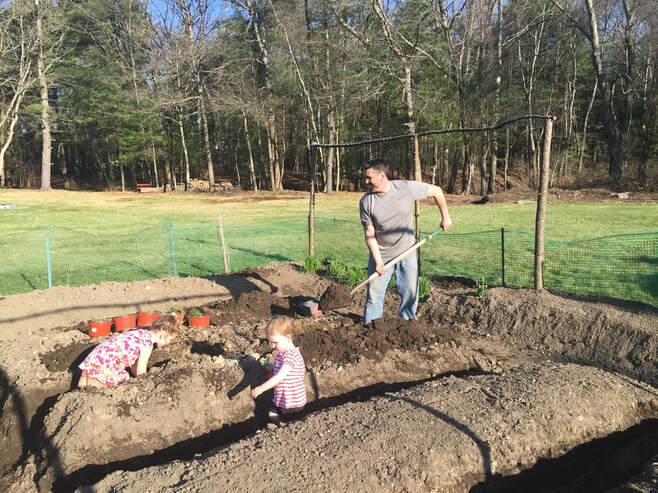 We actually have an entire section devoted to how to make raised beds and why you should try them. We would encourage you to read that here when you have time. The short version is you are basically just taking any good dirt from the walkways and piling it on top of the dirt you'll be growing your vegetables in. The higher you can pile it up the better but anything is better than not doing it at all. Once you hit the clay and rocks you should stop but don't be shy when digging out the paths. All that great nutrient rich soil would be better surrounding your roots than compacted under your feet. You'll notice in the sample design the perimeter of the garden is all beds with walking areas in the middle. This is to maximize space assuming you'll be able to get at the vegetables to pick them from the other side of the fence. If that's not an option in your space, you may want to make your path go around the outside with beds pushed to the middle. Again, there is no right or wrong, just make the best of what space you have to work with. Step 5: Plant Your Garden Finally. The time has come to actually plant something. But how? and when? Don't worry, we have you covered... EARLY APRIL Tomatoes and Peppers - The most cost effective way to grow anything is by seed. Everything in the sample plot can be grown from seeds planted directly in the garden with the exception of tomatoes and peppers. You can still grow both from seed but you'll need to start them indoors and transplant to the garden in late May. It adds a much higher degree of difficulty but why not give it a shot? Worst case you have to buy started plants from a greenhouse. Best case you save a bunch of money. A packet of tomato seeds will run you about $2 while each individual plant will go for $3-$5 at the garden center. Learn all about where to get your seeds and how to start them indoors here. Peas - Peas can be planted as soon as your garden is ready. You'll want to plant them against the fence so they can grow up it like a little trellis. For full details on how to plant and grow peas, click here. By early June you should be picking daily. You have never tasted a real sugar snap pea until you grow one yourself and even kids love them as a healthy snack. LATE APRIL By now the soil should be warm enough for Kale and Swiss Chard seeds to germinate. We recommend these over traditional salad greens because they will be there for you in the heat of mid-summer when lettuce and spinach would have given up and gone to seed. Not only that, they will still be going strong well into the fall and even early winter some years. You could make salads for 6 months just with these 2 plants alone. Click here for instructions on growing Kale - and click here for Swiss Chard LATE MAY Cucumbers - Like the peas you'll want to let cucumbers climb the fence. If you can construct a little trellis to let them grow higher that would be even better. You'll probably get more than you would ever want for eating fresh but try making your own pickles or relish and you can enjoy them all year long. Click here for instructions on how to grow cucumbers. Pole Beans - Despite their name, it is even easier to grow pole beans up a fence or trellis than on a pole. If you do have a trellis, it will fill in very thickly so be careful you don't put it in a spot where it will cast shade on the rest of your garden. You'll be surprised how much you like them fresh and you can also pickle them or harvest the beans inside once they dry out. Here is how to plant and grow pole beans Carrots - Since those pole beans will stay tight to the fence and grow straight up you can sneak a row of carrots in front of them. Carrots are nice to have because you can just leave them in the dirt and pull them out as needed, and unless you eat them all before they will last beyond the first fall frost. Try using them as a replacement for potatoes, they taste just as good mashed or cut like french fries with the bonus of actually having nutritional value. Find detailed instructions for how to grow carrots here. Tomatoes - In a raised bed tomatoes can be planted as close as 18" apart. Using the example garden plot above you would be able to plant up to 8 tomato plants in an 8'x3' bed if planted in 2 staggered rows. I'd say to make 1 or 2 of those cherry tomatoes and be a little adventurous with the full size plants. There are a huge variety of tomatoes that come in many shapes, sizes, and colors that you'll never find at a grocery store or even a farmer's market. We also plant basil from seed in-between our tomato plants, so if you were hoping to have some fresh herbs mixing them in the tomato bed is a great option. Here is all you need to know on planting tomatoes. Peppers - Peppers do best when planted close together so they can form a little canopy. In the sample plot above you have room for 12-14 pepper plants planted in 2 rows 1' apart. If you're planning to do a mix of hot and sweet peppers this is a good number. If that sounds like too many, you could just do 6-8 and mix in a couple eggplants as well. There are endless pepper varieties you can try that range from sugary sweet to blazing hot. You would be surprised how much kids like to snack on them, especially the smaller varieties. You should get fresh sweet peppers for 3 solid months and with 4-6 hot pepper plants can grow enough to make a year's supply of your own homemade hot sauce. Click here for instructions on how to grow peppers  Time, effort, and a shovel is all you need. Your initial investment is probably somewhere in the $150 - $200 range (Chicken wire - $40, Seed packets for all 8 vegetables - $25, Loam - $60/3 yards, Compost- $25-$50 depending on type). There may be other expenses from watering, etc. along the way but you will notice a huge difference in your grocery bill when you barely have to buy any produce from July-October. And just think about how good it will feel to know your family is eating healthy food grown 100% pesticide and chemical free right from your own backyard. All for the price of dinner for 2 at a fancy restaurant.
You may think you don't have time but all it takes is a weekend here and there to get this up and running. And if that example plot is too much for you, just do what you can. The healthiest most prolific pepper plant I have ever seen was grown in a system like this on a balcony, so you don't even need a yard to start your first garden. People have grown fresh vegetables in Antarctica and on the International Space Station. Where there's a will, there's a way. If you've been on the fence about starting a garden - this is your year! If the whole thing is a giant failure flip the dirt over and you got some free compost for next year's attempt. Everything in our world right now is so virtual and detached from reality. Making your own garden gives you a chance to use your hands to do something real and reconnect with the natural world. It might end up not being your thing, but you'll never know until you try. And if you need any help - just ask! - that's why we're here. Best of luck and we would love for you to share your progress with us on Facebook Garden Main Page Home Page
1 Comment
Wow, what a great job of explaining how to begin. I thought it was overwhelming to think I could have a garden at all, my husband was always the gardener, but when you put it down step by step, it makes me think we can all do it! Leave a Reply. |
Growing Ambition BlogWe'll cover a number of topics here from environmental issues to plant based recipes and everything in-between Archives
March 2020
Categories
All
|
 RSS Feed